

Pom pom garland.
If you're looking for a super fun way to jazz up a room, look no further! A pom pom garland is the latest trend! It is cheap to make, you can easily customize the look with different colours and pom pom size, and it's also very versatile; you can hang a combination of colourful pom poms in a kid's bedroom/play room/reading nook or drape it across a curtain rod in an adult space for a more whimsical and bohemian look. But the best part, is that it's super easy and quick to make! Yup, you read that right... this really is an EASY and QUICK project! Put your cardboard circles, forks, and whatever other gadgets aside and read on. With the "bulk" pom pom making method I'm about to show you, you'll be bustin' out pom poms left and right in no time!
Now, I know that the beautiful world wide web contains a plethora of DIY pom pom tutorials but I have not yet come across one that yields not only perfectly spherical pom poms, but ones that are ALL the same size without having to trim each for hours! Mine does :). Check out my very scientific method below...

To begin, you'll need yarn. How much? That depends on how many pom poms you'd like to make, the pom pom size, and the thickness of the yarn. I used one ball (approximately 109 meters) of chunky yarn to make five medium-sized pom poms. For small pom poms I suggest using thinner yarn. For bigger pom poms I found it was better to use thicker yarn (but it's not necessary). You'll also need two "posts" securely placed apart from one another around which you'll wrap the yarn. In order to obtain pom poms with a desired diameter AND ensure that they are all the same size, the posts must be placed a certain distance apart. To calculate this distance, I've developed the following formula that takes into account the pom pom size and quantity of pom poms you'd like to make at once:
post distance = (x+0.5)(y) where x = desired pom pom size; y = quantity of pom poms
My plan was to make 5 pom poms at once with an approximate diameter of 3.5". Plugging that into the handy formula:
post distance = (3.5+0.5)(5) = 20.
So, the distance between my posts needs to be 20". I simply drilled two long screws 20" apart into a scrap piece of 2x4 lumber. Because I wanted 5 pom poms, I divided the distance between the posts into 5 even sections of 4" and marked with an "X". Next, I divided each 4" section in half and marked that location with a simple line. Once the yarn is wrapped around the posts, you'll be tying strings at the line marks and cutting at the "X" marks.

Math was always my least favourite subject in school (actually, scratch that... physics was... and inorganic chemistry) so once I had this part figured out, it was time for the fun!
To start making the pom poms, tie the loose end of the yarn to one post and begin wrapping around both posts. Don't pull on the yarn too hard but don't leave slack either. You want the yarn to be just slightly taunt.

Wrap, wrap, wrap! Keep going round and round until your yarn is pretty bulky. The optimal bulkiness depends on the size of the pom poms you're making; smaller pom poms won't require as much yarn but bigger pom poms will require a lot more yarn. If you're unsure about whether you used enough yarn, just keep wrapping. It's better to have more yarn than not enough; the more you wrap, the fuller and rounder your pom poms will turn out and it's pretty much impossible to over do it so just keep wrapping! I used two types of yarn; three colours were chunky (#5) and the fourth was thinner (#3). For the chunky yarn I used the entire ball of approximately 109 meters. As for the thinner yarn... I purchased a ginormous ball and I have no idea how much of it I used for the pom poms. I went by feel (kind of like when you measure the quantity of spaghetti by hand) and just kept wrapping until the bulkiness was about the same as when I used the thicker yarn. When done, tie the loose end to one of the posts to prevent the yarn from unwrapping.

Next, tie strings at every point you marked with a line (ie: 2", 6", 10", 14" and 18" away from one post. These strings are the centre of each pom pom. You will need to use a very strong string that won't break when pulled. Wrap the string twice around the yarn and puuuuuuull! Pull really REALLY hard! Tie it as tightly as you can and knot it. Twice. You want the yarn to be tied very tightly so that the pom poms don't fall apart. The tighter you tie this string, the more secure the pom poms will be and the fuller they will appear. Also, pay attention to where you tie the string. It needs to be tied in the exact location of the line marks so that the pom poms are all the same size. If you're sloppy here, your pom poms will turn out to be different sizes. Once tied securely, cut off the excess loose string ends, but do leave a short tail so that your pulling efforts don't come undone.

Now it's time to cut and separate the yarn into actual pom poms. You will cut at every location marked with an "X", which should be exactly midway between the tied strings. Insert the scissors into half of the bulkiness of the yarn and cut through.

Then, cut through the remaining bulkiness. If you attempt to cut through the entire bulkiness at once, you'll end up cutting unevenly, which will result in non-spherical pom poms.
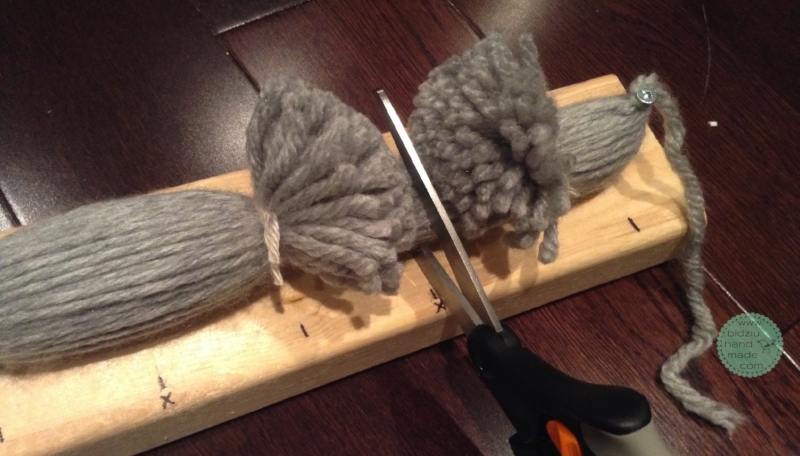

Make the other three cuts in between the strings to create 4 more pom poms. For the pom poms on each end attached to the posts, gently remove them from the posts and cut through the loops; to cut in the centre of these loops, slide scissors into the loops, gently pull upwards, then cut.

If you tied the strings and cut the pom poms at the exact mark locations, your pom poms should be perfectly spherical. But, let's be real! Who is THAT perfect??? Chances are one side of your pom pom is a bit off or there are a few longer stray yarn strands here and there. To fix this, simply use your hands to flatten the part of the pom pom that is "off" and trim with scissors. Keep trimming all the way around, wherever necessary, little by little, until your pom pom is nice and round.

And there you go! Five (or however many you decided to make) beautiful pom poms done in no time at all!

Now repeat the above process with different yarn colours to make more pom poms! Notice how the mint pom poms in the front row have a different "texture" than the rest? Those are the pom poms made with the thinner yarn. Ideally, I wanted all of the pom poms in this garland to be made using the same type of yarn but I could not find thicker yarn in the right shade of mint so I opted for the thinner yarn. Once the garland is complete and is hanging in its spot, this difference will be barely noticeable.

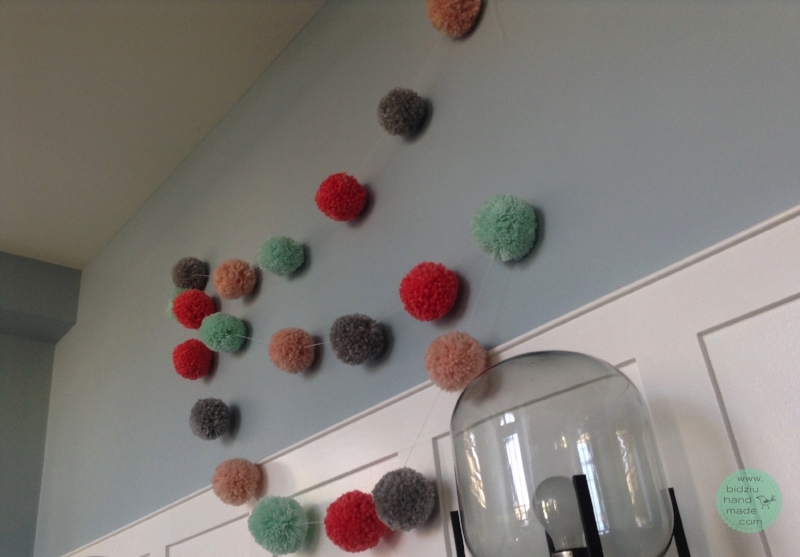
Finally, to complete the garland use a long needle and craft string of your choice (twine, yarn, etc.) and simply push the needle straight through the centre of each pom pom, pulling the pom pom onto the string. I used 5 meters of thin craft twine and separated my pom poms about 6-8" apart.
Here is a garland I recently completed for a customer with pink, mint, gray, and coral pom poms.


And this garland with pink, turquoise, white, and lavender pom poms was hung on the top rail of my daughter's bed...

Combined with a string of tiny LED lights, this garland creates a sweet, warm and charming atmosphere in her bedroom.